Invoices
Create itemized invoices, track payments, send them to clients, and share secure public links for online viewing and payment.
Overview
The Invoices module lets you:
- Create invoices with line items, per-item and overall discounts
- Track invoice status from draft through paid
- Publish invoices to make them visible in the client portal
- Email (and re-email) invoices to clients
- Record payments and watch the balance update automatically
- Download or print a PDF of any invoice
- Generate a secure public share link so clients can view and pay without signing in
- See a view history of when an invoice was opened
The Billing section in the sidebar (including Invoices) requires the usage-based-billing license feature on your plan. Invoice actions are gated by the invoices permission (read, create, update, delete, plus publish, email, void, and duplicate); recording payments uses a separate invoice payments permission.
Navigate to Invoices
Go to Billing → Invoices in the left sidebar.
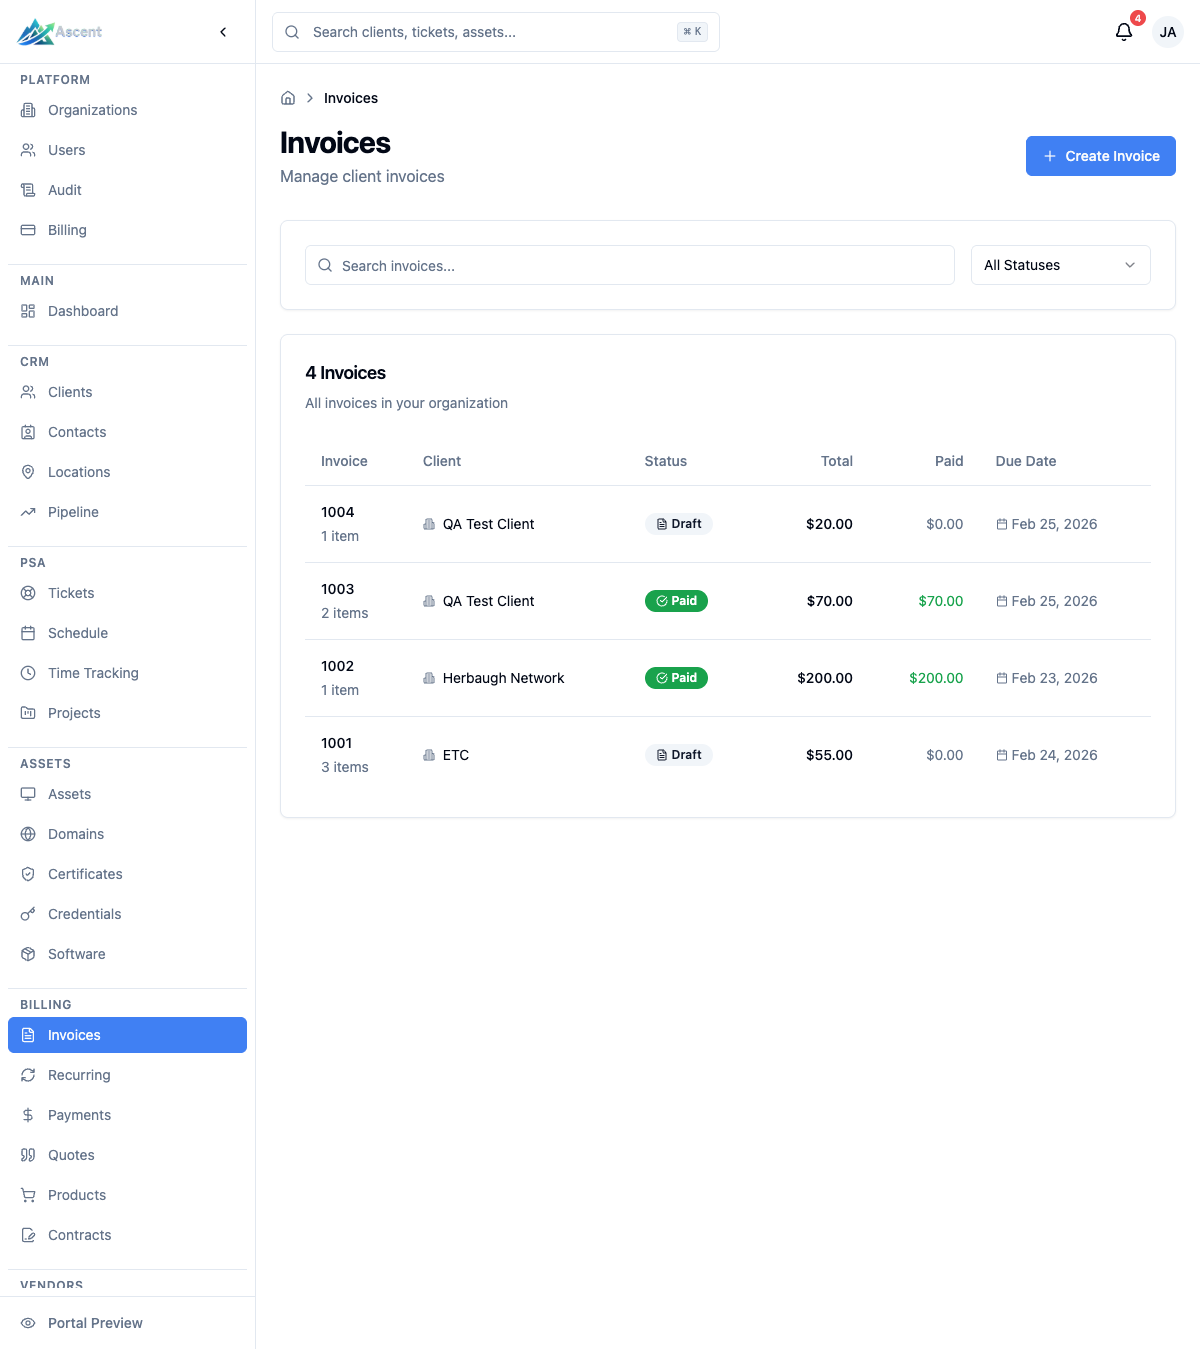
Invoice List
The list shows the following columns:
| Column | Description |
|---|---|
| Invoice | Invoice number and the number of line items |
| Client | The billed client (links to the client record) |
| Status | Current status badge |
| Total | Invoice total |
| Paid | Amount paid so far |
| Due Date | Payment due date (shown in red when overdue) |
Use the Search invoices... box to search, and the Status dropdown to filter the list. The filter offers All Statuses, Draft, Sent, Viewed, Partial, Paid, Overdue, and Void. Results are paginated 25 per page. If you have a global client filter active, the list is scoped to that client.
Invoice Statuses
| Status | Description |
|---|---|
| Draft | Being prepared; not yet visible to the client |
| Published | Finalized and visible in the client portal |
| Sent | Delivered to the client by email |
| Viewed | The client has opened the invoice |
| Partial | Partially paid (a balance remains) |
| Paid | Fully paid |
| Overdue | Past the due date with a balance remaining |
| Cancelled / Void | Cancelled invoice; cannot be modified or paid |
Creating an Invoice
- From the Invoices list, click Create Invoice.
- Select the Client (required).
- Optionally choose a Bill To Contact. If you leave this blank, the invoice goes to the client's billing or primary contact.
- Set the Due Date (required). It defaults to 30 days out.
- Add Line Items (at least one is required) — see below.
- Optionally apply an overall Discount (percentage or fixed amount) in the sidebar.
- Optionally add Notes for the client (payment terms, instructions, etc.).
- Click Create Invoice.
A new invoice is created in Draft status and opens on its detail page. You publish or email it as a separate step.
Linking an invoice to a project
When you start an invoice from a project's Create Invoice quick action (on the project detail page), the new-invoice form pre-selects the project's client and shows the Project read-only — the invoice is linked to that project when you save. The project must belong to the same client as the invoice, so changing the Client removes the link. Invoices created directly from the Invoices list have no project link.
You can also generate invoices automatically from recurring billing schedules and convert billable time into invoices. See the Recurring and Time to Invoice pages.
Line Items
Each line item supports:
| Field | Description |
|---|---|
| Product | Optionally pick a product from your catalog to auto-fill the description and unit price |
| Description | Free-text description of what's being billed |
| Quantity | Number of units or hours |
| Unit Price | Price per unit |
| Discount Type | Percentage or Fixed Amount, applied to this line |
| Discount % / Discount Amount | The per-line discount value |
| Amount | Calculated line total after the per-line discount |
Click Add Item to add more lines and the trash icon to remove a line (at least one line must remain).
Invoice Detail Page
The detail page header shows the invoice number, client, and status, along with stat cards for Total, Paid, Balance Due, and Due Date.
Tabs
| Tab | Contents |
|---|---|
| Line Items | Itemized charges with subtotal, tax, discount, and total; plus any notes |
| Payments | Payment history (date, method, reference, amount) |
| View History | A log of each time the invoice was viewed, including viewer, type, IP address, browser, and timestamp |
Sidebar
- Bill To — client and (if set) the billing contact
- Details — invoice number, issue date, due date, and created date
- Actions — quick access to Download PDF and Preview / Print
- Share Link — generate, copy, open, or revoke a public link (shown for non-draft, non-void invoices)
Available actions
Which buttons appear depends on the invoice's status:
| Action | When available |
|---|---|
| Edit | Any status except Paid, Void, or Cancelled |
| Publish | Drafts only |
| Email Invoice | Published/active invoices (not Draft, Paid, Void, or Cancelled) |
| Record Payment | Any active invoice with a remaining balance (not Draft, Void, or Cancelled) |
| Delete | Drafts only |
| Void | Active invoices that are not Draft, Paid, Void, or Cancelled |
Publishing and Sending
Ascent separates publishing from emailing:
- Publish (drafts only) finalizes the invoice and makes it active and visible in the client portal. Publishing can also send an email notification to the client.
- Email Invoice sends or re-sends the invoice email to the client. You can use it multiple times, for example to send a reminder.
To publish a draft, open it and click Publish.
PDF
From the detail page sidebar:
- Download PDF saves the invoice as a PDF file named
invoice-<number>.pdf. - Preview / Print opens the PDF in a new browser tab for viewing or printing.
Public Share Link
You can share a secure, unauthenticated link that lets a client view (and, when online payments are configured, pay) an invoice without signing in.
- Open a published (non-draft, non-void) invoice.
- In the Share Link card, click Generate Share Link.
- Use Copy Link to copy the URL, or the globe button to open it in a new tab.
- To disable the link, click Revoke Link — any previously shared URL stops working immediately.
The public page shows the invoice details, your organization's branding (name and logo), line items, totals, and recorded payments. If the organization has Stripe online payments configured and a balance remains, a Pay Now button appears so the client can pay the invoice directly from this page.
Recording Payments
- Open the invoice and click Record Payment (or Record Payment on the Payments tab).
- Enter the Amount (defaults to the full balance due; it cannot exceed the balance).
- Choose a Payment Method: Cash, Check, Credit Card, ACH Transfer, Wire Transfer, or Other.
- Optionally add a Reference (for example, a check number or transaction ID).
- Click Record Payment.
The invoice's paid amount and status update automatically. See the Payments page for the organization-wide payments view.
Voiding and Deleting
- Void marks an invoice as void with an optional reason. Voided invoices cannot be modified or paid. You cannot void a paid invoice.
- Delete is available only for drafts and removes the invoice permanently.
Best Practices
- Write clear descriptions so clients understand each charge.
- Itemize properly rather than lumping everything into one line.
- Review before publishing — drafts are private until you publish.
- Use the share link for clients who don't log in to the portal.
- Follow up on overdue invoices using the Email Invoice action as a reminder.
- Void rather than delete any published invoice you need to cancel, to preserve the audit trail.