Clients
Clients are the companies and organizations your MSP provides services to. They are the anchor record that contacts, assets, tickets, invoices, and more attach to.
Overview
The Clients module lets you:
- Maintain a directory of every client your organization serves
- Track each client's type (lead, prospect, customer, former) and status (active, inactive, archived)
- Store contact details, address, and per-client billing settings (currency, net terms, default rate, tax)
- See at-a-glance counts of related contacts, assets, and tickets
- Drill into a client to view contacts, locations, tickets, assets, invoices, quotes, projects, checklists, and portal settings
- Monitor a client's health score and trend over time
- Create an invoice directly from a client's unbilled time
Navigate to Clients
Go to CRM → Clients in the left sidebar (/clients).
Client list
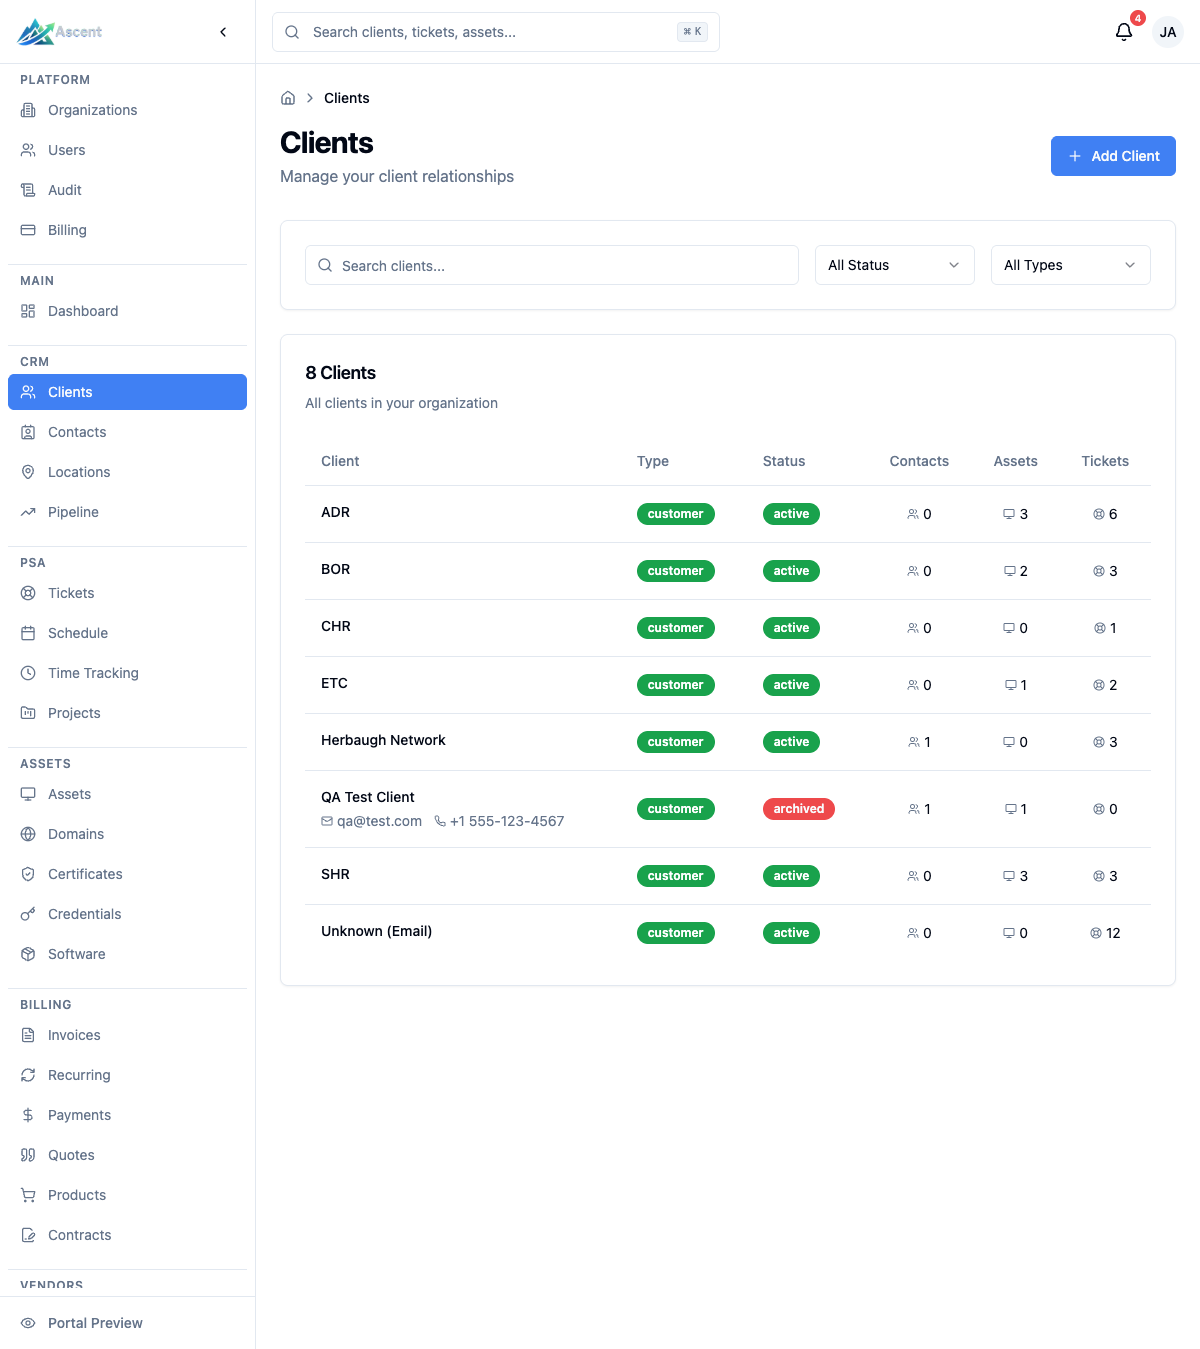
The list shows the total client count and a search-and-filter bar above the table.
Filters
| Filter | Options |
|---|---|
| Search | Free-text search box ("Search clients...") — matches client name, email, and reference number |
| Status | All Status, Active, Inactive, Archived |
| Types | All Types, Lead, Prospect, Customer, Former |
Filters and the current page are kept in the URL, so a filtered view can be bookmarked or shared. The list is paginated (25 per page) with Previous / Next controls.
List columns
| Column | Description |
|---|---|
| Client | Company name, with email and phone shown beneath when present |
| Type | Lead, Prospect, Customer, or Former |
| Status | Active, Inactive, or Archived |
| Contacts | Number of associated contacts |
| Assets | Number of associated assets |
| Tickets | Number of associated tickets |
Click any row (or the client name) to open the client's detail page.
Note: On plans limited to a single client, opening Clients takes you straight to that client's detail page. When your plan's client limit is reached, the Add Client button is hidden.
Creating a client
- Click Add Client (top right of the Clients list).
- Under Basic Information, enter the Client Name (required) and choose a Client Type (Lead, Prospect, Customer, or Former). Optionally add a Reference Number.
- Under Contact Information, add Email, Phone, and Website.
- Under Address, fill in Street Address, City, State/Province, ZIP/Postal Code, and Country.
- Under Financial Settings (sidebar), set the Currency (USD, EUR, GBP, CAD, AUD), Net Terms (Days), Default Hourly Rate, and Tax Rate (%), or toggle Tax Exempt.
- Under Source, optionally record a Lead Source.
- Add free-form Notes if needed.
- Click Create Client.
You'll be taken to the new client's detail page.
Client fields
| Field | Notes |
|---|---|
| Name | Required |
| Type | LEAD, PROSPECT, CUSTOMER (default), or FORMER |
| Status | ACTIVE (default), INACTIVE, or ARCHIVED — set when editing, not on create |
| Reference Number | External account/reference number |
| Website, Email, Phone | Contact details |
| Address, City, State, ZIP, Country | Primary address |
| Currency | Defaults to USD |
| Net Terms | Payment terms in days (default 30) |
| Default Hourly Rate | Used as the default rate when billing this client's time |
| Tax Rate | Percentage applied to invoices |
| Tax Exempt | When on, no tax is applied |
| Lead Source | How the client found you |
| Notes | Free-form internal notes |
| Level Account ID | The Level RMM group/folder this client maps to. Shown read-only on the detail page sidebar when set; it is not exposed in the create or edit form in this version. |
Client detail page
The detail page opens with the client's name, type, and status badges, plus the reference number if set. The header includes Back, Edit, and (with the right permission) Delete actions. When a client has unbilled time, an Invoice Time shortcut also appears.
A stats grid summarizes Contacts, Assets, Open Tickets, and Invoices, each linking to the filtered list for that client.
Tabs
| Tab | What it shows |
|---|---|
| Overview | Health score card, contact information, address, billing settings, and notes |
| Contacts | Contacts for this client, with an Add Contact action |
| Locations | The client's locations |
| Tickets | Tickets for this client, with a Create Ticket action |
| Assets | Hardware and other assets tracked for this client |
| Invoices | Invoices issued to this client |
| Quotes | Quotes for this client |
| Projects | Projects for this client |
| Checklists | Checklists associated with the client |
| Portal | Client portal links and security settings (see below) |
Editing a client
- Open the client detail page.
- Click Edit.
- Update any fields, then save.
Deleting a client
Click Delete (requires the clients delete permission). If the client is not already archived, deleting archives it first and then removes it along with its associated data. This action cannot be undone.
Merging duplicate clients
When the same real-world customer ends up as two separate client records — most commonly after importing from more than one system (for example a Hudu and an ITFlow migration that both create "Acme Corp") — you can merge the duplicate into the record you want to keep.
- Open the surviving client (the record you want to keep) — this is the target of the merge.
- Click Merge (requires the
clientsmerge permission). - Search for and select the duplicate client to merge in — this is the source.
- Confirm. Every record attached to the duplicate — contacts, locations, assets, tickets, projects, quotes, invoices, contracts, documents, credentials, tags, and the rest — is re-pointed to the surviving client, and the duplicate is then permanently deleted.
Notes:
- The merge is irreversible. The duplicate client is deleted once its records have moved. Pick the survivor carefully.
- Tags, access-group memberships, and one-per-client settings are de-duplicated. If both clients share a tag or access group, the survivor keeps a single copy. One-to-one settings that exist on both (security/portal settings and a Microsoft 365 connection) are kept from the survivor; the duplicate's copies are discarded.
- Migration links follow the survivor. Records that map an imported record to the duplicate are updated to point at the survivor, so re-running the original migration updates the surviving client instead of recreating the duplicate.
- System records can't be merged. The locked "Unknown (Email)" system client can be neither the source nor the target of a merge; triage its tickets from the Needs triage view instead.
- Every merge is recorded in the audit log with the source and target, and a count of the records that were moved.
Client health score
The Overview tab shows a Health Score card with the client's current score out of 100, a status badge, supporting metrics, and a trend chart that builds up from daily snapshots.
| Status | Score range |
|---|---|
| Healthy | 70–100 |
| At Risk | 40–69 |
| Critical | 0–39 |
The score is computed from recent service activity, including:
- Open and overdue ticket counts
- Change in ticket volume
- Average response time
- Days since last activity
- Whether the client has an active contract (a small bonus)
The card also surfaces Open Tickets, Overdue, Avg Response (hours), and Last Activity (days ago). Scores refresh daily; an archived or inactive client keeps its history but shows no current score. The trend chart appears once at least two daily snapshots exist.
Portal settings
The Portal tab manages the client portal experience for this client's external users. From here you can:
- Copy a Registration Link and Login Link to share with the client
- Configure a Single Sign-On (SSO) provider — Microsoft Entra ID, Google Workspace, Authentik, or a custom OIDC provider (one per client)
- Require and configure Multi-Factor Authentication (Authenticator App / TOTP and Security Keys / Passkeys / WebAuthn)
- Set a Password Policy (minimum length and character requirements)
- Set the portal Session Timeout
For portal usage from the client's perspective, see the Client Portal docs.
Best Practices
- Set the right type. Use Lead/Prospect for sales-stage records and Customer for active accounts so your pipeline and reporting stay clean.
- Fill in billing settings. Currency, net terms, default rate, and tax drive accurate invoicing — set them before billing time.
- Watch the health score. Use the Overview health card to spot at-risk and critical clients early.
- Archive instead of leaving stale records. Set former clients to the Former type and archive accounts you no longer service to keep the active list focused.