Roles & Permissions (RBAC)
Roles & Permissions is where you control what each team member can see and do in Ascent. It combines three built-in system roles, optional custom roles with a granular permission matrix, and client access groups for limiting which clients a user can work with.
Overview
The Roles & Permissions page lets you:
- Review the three built-in system roles (Owner, Admin, Member) and their member counts.
- Create, edit, and delete custom roles with a fine-grained permission matrix.
- Seed a set of ready-made specialized roles (Billing Admin, Help Desk Manager, and more) with one click.
- Restrict a role's client access so members only see clients in specific client access groups.
- Grant a member temporary elevated permissions that expire automatically from the Just-in-Time Access tab.
- Track every role, permission, and access-group change in a built-in audit log.
This page lives under Admin → Roles & Permissions (/admin/rbac). The Admin section is shown to Owners and Admins, and the individual tabs are gated by the matching read permissions (roles.read for the Roles tab, client_access_groups.read for Client Access Groups, and audit.read for the Audit Log). The Just-in-Time Access tab is available to Owners and Admins.
How permissions work
Ascent uses a layered model:
- System role — Every member has one of
OWNER,ADMIN, orMEMBER. This is the baseline. - Custom role (optional) — A member can be assigned one custom role, which replaces the default permission set with the granular permissions you define.
- Client access — A role (or individual user) can be set to All Clients or Restricted. Restricted access limits the member to clients in the access groups they belong to.
The server always enforces permissions. UI elements are shown or hidden based on the same rules, but every API request is re-checked server-side.
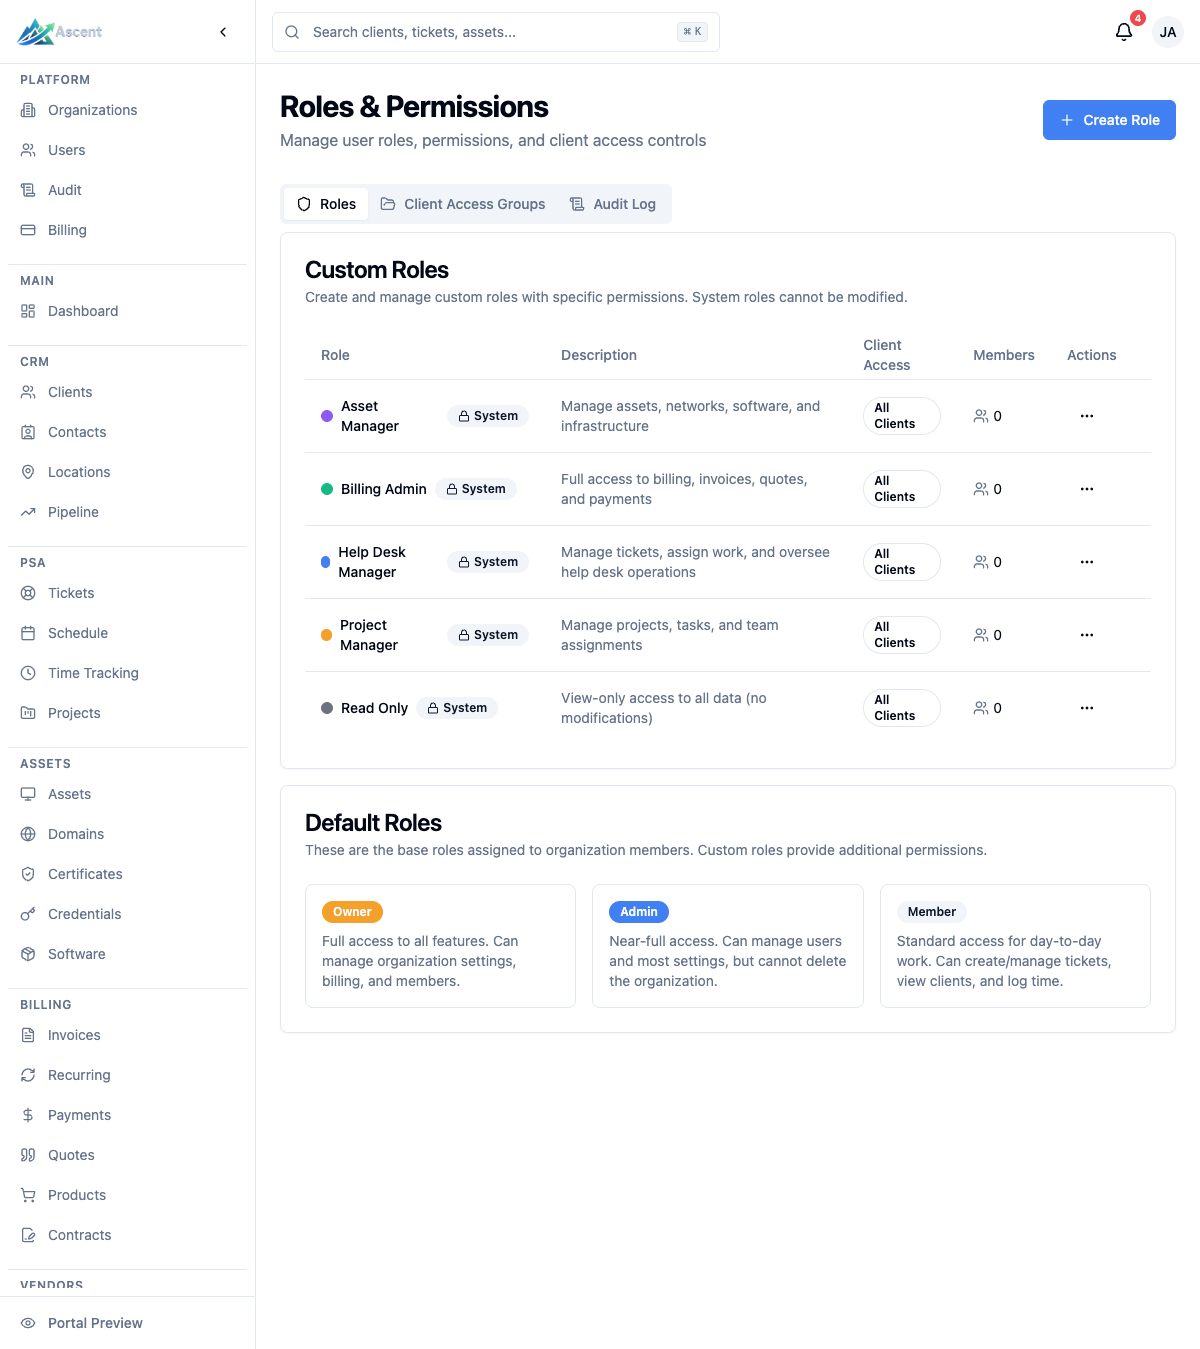
Built-in system roles
These three roles are always present, cannot be edited or deleted, and appear in the Custom Roles table on the Roles tab marked with a System badge. The Default Roles card lower on the same tab summarizes each one.
| Role | Description | Permissions |
|---|---|---|
| Owner | Full access to all features. Can manage organization settings and users. | All permissions (*) |
| Admin | Administrative access to most features except organization-level settings. | All permissions except organization.manage (retains organization read and update) |
| Member | Standard access for daily operations. | Read access to clients, contacts, and locations; full ticket access (create/read/update + replies and time); asset read/update; read-only invoices and quotes; task and project work; checklists; document read/create/update; dashboard and calendar; on-call view plus alert acknowledge/resolve |
The Owner role cannot be reassigned through the app — owners are set when the organization is created.
Seeding specialized roles
If your organization doesn't yet have the prebuilt specialized roles, a Seed Default Roles button appears in the page header. Clicking it creates any of these roles that are missing (existing roles are skipped):
| Role | Purpose |
|---|---|
| Billing Admin | Full access to billing, invoices, quotes, products, recurring invoices, payments, and contracts, plus read access to clients/contacts and reports. |
| Help Desk Manager | Manage tickets (including assign), replies, and ticket time; read clients and update contacts; asset read/update; documents and calendar. |
| Asset Manager | Full control of assets, networks, racks, software, domains, certificates, and credentials (including reveal). |
| Project Manager | Manage projects and tasks, read tickets and clients, manage documents and calendar, and run reports. |
| Read Only | View-only access across data with no edit capability. |
These appear in the Custom Roles table once created. They are created as system-managed roles and carry the System badge, so — like the built-in Owner/Admin/Member roles — their Edit and Delete options are disabled. To customize one, create a new role instead and copy the permissions you want.
Managing custom roles
Create a role
- Click Create Role in the page header.
- Enter a Role Name (for example, "Technician Lead").
- Pick a Color for the role badge.
- Optionally add a Description.
- Toggle Admin Role if this role should be treated as an administrative role.
- Toggle Restrict Client Access if members should only access clients in assigned access groups (off = All Clients).
- In the Permissions section, click each action button to toggle it on or off for the resources you want to grant.
- Click Create Role.
Edit a role
- On the Roles tab, open the ⋯ (actions) menu for a custom role and choose Edit.
- Adjust the name, color, description, toggles, or permissions.
- Click Save Changes.
System roles cannot be edited; the Edit option is disabled for them. This includes both the built-in Owner/Admin/Member roles and any seeded specialized roles (which are also system-managed).
Delete a role
- Open the ⋯ menu for a custom role and choose Delete.
- Confirm in the dialog.
A role can only be deleted when it has no assigned members — the Delete option is disabled while members are still assigned. Reassign those members first. System roles can never be deleted.
Permission matrix
Permissions follow the format resource.action. The role editor groups them into the categories below. Standard actions are create, read, update, and delete; many resources add extended actions.
| Category | Resources | Notable extended actions |
|---|---|---|
| CRM | clients, contacts, locations | clients: restore, impersonate |
| Ticketing | tickets, ticket replies, ticket time, ticket routing rules/pools/log, technician skills | tickets: assign, archive, restore |
| Assets | assets, networks, racks, software | assets: restore |
| Billing | invoices, invoice payments, quotes, products, recurring invoices | invoices: publish, email, void, duplicate, download; quotes: convert, accept, decline; recurring: generate |
| Projects | projects, tasks, checklists, checklist templates | checklists: assign, archive |
| Documents | documents, document folders, document templates | documents: download, versions |
| Credentials | credentials | credentials: reveal |
| Services | services, vendors, domains, certificates, contracts | — |
| Administration | organization, users, roles, integrations, audit, client access groups, email templates | organization: manage; users: invite, impersonate; integrations: manage |
| Reporting | reports, dashboard, feedback analytics | reports: export; feedback analytics: export |
| On-Call | on-call rotations, schedule, escalation policies, alerts | rotations: generate; schedule: override; alerts: acknowledge, resolve, silence |
Only valid resource.action combinations are accepted — the editor only shows actions that apply to each resource.
Assigning members to roles
The Roles & Permissions page is for managing the role definitions themselves. A member's role assignment (their system role and optional custom role) is set per user through user management, and requires the Owner or Admin role. When you assign a custom role, the member's underlying system role is set to Admin if the custom role is marked as an admin role, otherwise Member. The Owner role cannot be assigned to anyone after organization creation.
Client access groups
The Client Access Groups tab lets you bundle clients together so you can grant access to a set of clients at once. This is what powers a role's Restrict Client Access setting.
A group can be assigned to:
- System roles (Owner, Admin, Member) and/or custom roles — anyone with an assigned role gets access to the group's clients.
- Individual users — direct access in addition to role-based access.
Create a client access group
- On the Client Access Groups tab, click Create Group.
- Enter a Group Name and pick a Color.
- Optionally add a Description.
- On the Roles subtab, check the system and/or custom roles that should have access.
- On the Users subtab, check any users who should have direct access.
- Click Create Group.
View, edit, and delete groups
- Use the ⋯ menu and View Details to see the group's clients, roles with access, and users with direct access.
- Choose Edit to change the name, color, description, roles, or users.
- Choose Delete to remove the group. Deletion is blocked while the group is still assigned to any role or user — remove those assignments first.
Audit log
The Audit Log tab records changes to roles, permissions, and client access groups. Each entry shows the time, the user who made the change, the action (such as CREATE, UPDATE, DELETE, or PERMISSION_CHANGE), and the affected entity type. Click View on a row to see the previous and new values for that change. Viewing the audit log requires the audit read permission.
For organization-wide activity beyond RBAC, see the dedicated Audit Logs page.
Just-in-Time access
Sometimes a member needs more access than their role allows — but only for a short while. A technician might need to publish an invoice while the billing admin is out, or you might need to hand someone full administrative access to work through an emergency. Rather than permanently changing their role (and remembering to change it back), use Just-in-Time access to grant the extra permissions temporarily. The grant expires on its own at the time you set, so access can't be left switched on by accident.
The Just-in-Time Access tab lists current grants and lets you create new ones. Just-in-Time access is part of the Professional plan and above; if your plan doesn't include it, the tab is read-only and the Grant Access button is unavailable.
"Just-in-Time access" here means temporarily elevating an existing member's permissions. It is unrelated to SSO "JIT provisioning", which automatically creates user accounts the first time someone signs in through your identity provider.
How elevated access behaves
- Additive. The grant is added on top of the member's existing role — it never takes anything away. When it ends, they simply drop back to their normal role.
- Time-boxed. Every grant has an expiry. Once it passes, the elevated permissions stop applying automatically — the member doesn't need to sign out and back in, and you don't need to do anything.
- Auditable. Granting, revoking, and automatic expiry are all recorded in the audit log so there's a complete record of who had elevated access, when, and why.
Grant elevated access
- On the Just-in-Time Access tab, click Grant Access.
- Choose the Member to elevate. Owners (who already have everything) and portal clients can't be selected.
- Pick a Duration — from 15 minutes up to 3 days. The grant expires automatically at the end of this window.
- Enter a Reason. This is required and is stored in the audit log, so be specific (for example, "Covering invoicing while Sam is on PTO").
- Choose what to grant:
- Leave Grant full administrative access off to pick specific permissions — toggle the individual
resource.actionbuttons, exactly like the role editor. - Turn Grant full administrative access on to give the member every permission for the duration. Use this sparingly, for genuine emergencies.
- Leave Grant full administrative access off to pick specific permissions — toggle the individual
- Click Grant Access.
The new grant appears in the table immediately, and the elevated permissions take effect on the member's next request.
Review and revoke grants
The table shows each grant's member, Scope (either Full Admin or the number of permissions granted), reason, status, expiry time, and who granted it.
- ACTIVE — currently in effect.
- EXPIRED — the window has passed; the extra permissions no longer apply.
- REVOKED — an admin ended the grant early.
To end an active grant before its expiry, click Revoke on its row and confirm. The member's permissions drop back to their base role right away. Expired and revoked grants stay in the table as a history and have no further actions.
Prefer a short duration and specific permissions over full-admin access. You can always grant again if more time is needed, and a tightly scoped, short-lived grant is far easier to reason about in the audit log.
Best Practices
- Start from least privilege. Grant only the actions a role needs and add more later.
- Use the seeded roles as a baseline. Billing Admin, Help Desk Manager, Asset Manager, Project Manager, and Read Only cover common job functions. Because they are system-managed and can't be edited, create your own custom role when you need a variation.
- Restrict client access for scoped teams. Combine Restrict Client Access with client access groups when technicians should only see a subset of clients.
- Reach for Just-in-Time access for short-term needs. Grant temporary, scoped permissions that expire on their own instead of permanently changing a member's role for a one-off task.
- Review the audit log after changes. Confirm permission and role changes landed as intended and track who made them.