Assets
The Assets module is your hardware and infrastructure inventory. It tracks the IT equipment you manage for each client — workstations, servers, network gear, and more — and surfaces live device data for assets linked to Level RMM.
Overview
The Assets module lets you:
- Track physical and virtual IT equipment across all your clients
- Record hardware specs, network details, purchase cost, and warranty dates
- Link each asset to a client, a site location, and (optionally) a rack position
- See live status, security score, last user, and last reboot for Level RMM devices
- Associate contacts and credentials with an asset, and see counts of linked documents, software, and tickets
- Run checklists against an asset
- Edit or permanently delete an asset
Navigate to Assets
Go to Assets → Assets in the sidebar to open the inventory list.
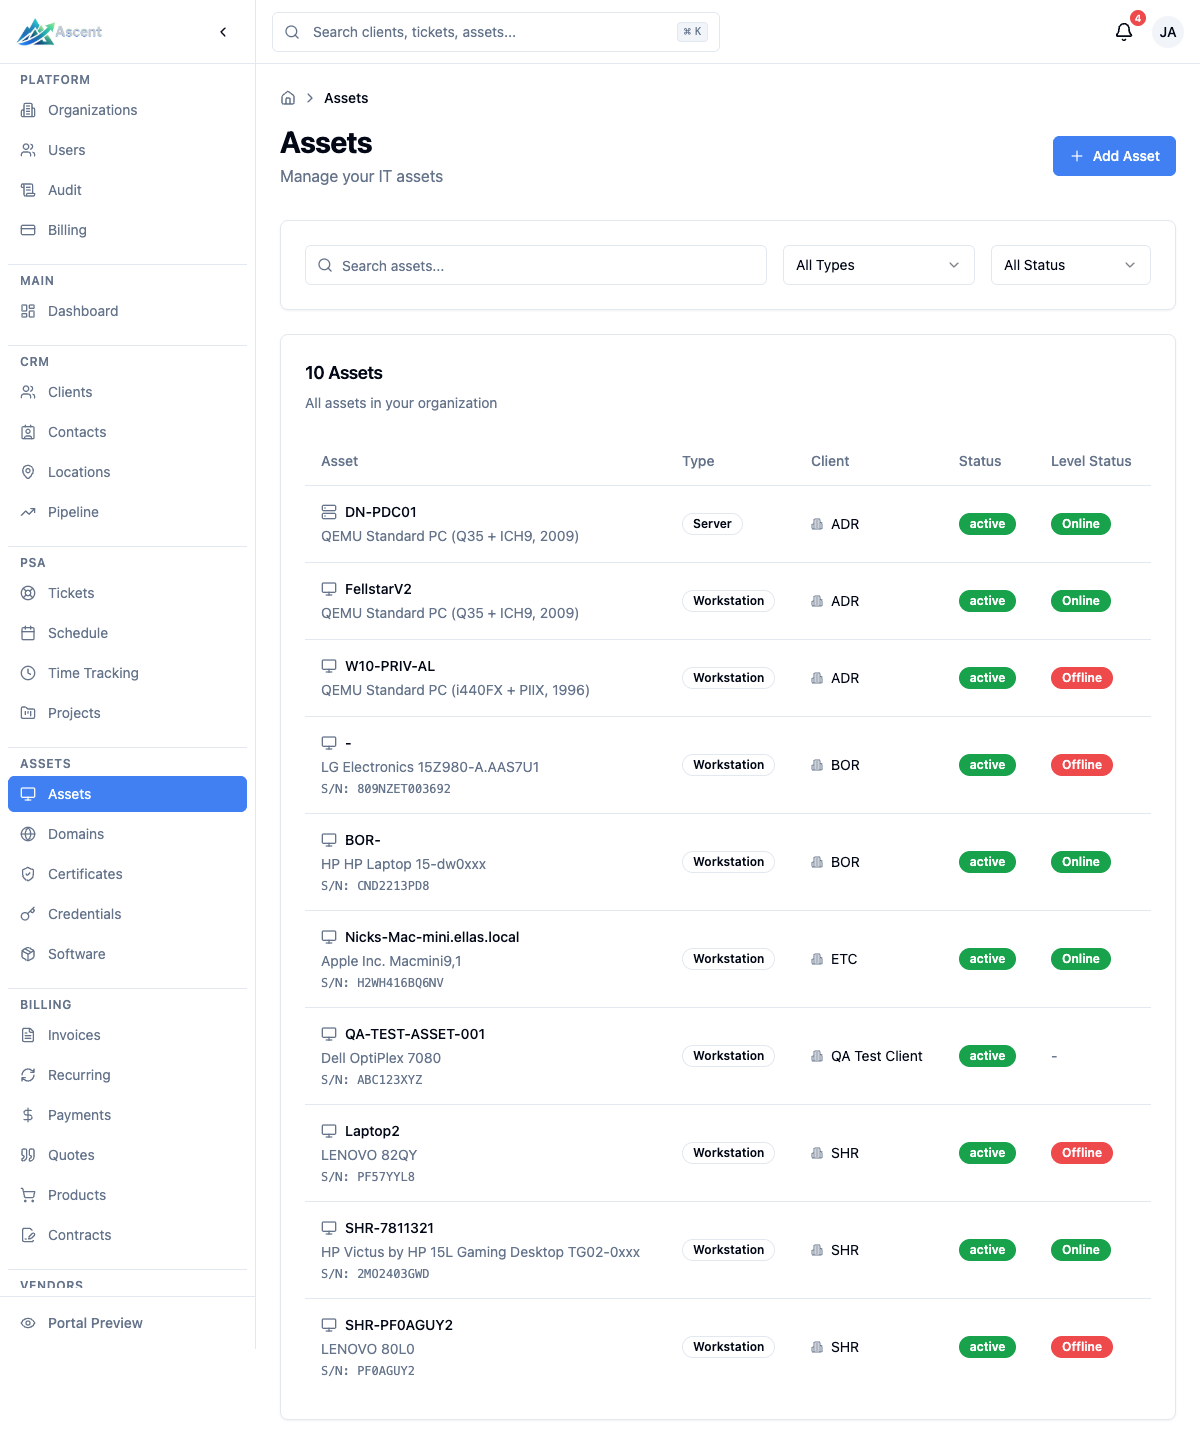
Asset list
The list is paginated (25 per page) and shows the following columns:
| Column | Description |
|---|---|
| Asset | Asset name, plus make/model and serial number (S/N) when set |
| Type | The asset type (e.g. Server, Workstation, Network Switch) |
| Client | Owning client, with the site location underneath. Shows Unassigned if no client is set |
| Status | Lifecycle status badge (Active, Inactive, Maintenance, etc.) |
| Level Status | Live status for Level RMM devices (e.g. Online/Offline); shows - for assets that aren't synced |
Click any row to open the asset detail page.
Filtering and search
The filter bar above the table provides:
- Search assets… — free-text search
- All Types — filter by a single asset type
- All Status — filter by Active, Inactive, Maintenance, or Retired
The list also respects the global client filter, so selecting a client elsewhere in the app narrows the asset list to that client.
Asset types
Assets use a fixed set of types. The create-asset form offers all of them: Workstation, Laptop, Server, Virtual Machine, Network Switch, Router, Firewall, Access Point, Printer, Scanner, Phone, Mobile, Tablet, NAS, SAN, UPS, and Other.
The asset list's All Types filter offers the same set except Scanner and SAN, which can still be assigned when creating or editing an asset.
Asset statuses
| Status | Meaning |
|---|---|
| Active | In service (the default for new assets) |
| Inactive | Not currently in use |
| Maintenance | Under repair or being serviced |
| Retired | End of life; an asset must be retired before it can be permanently deleted |
| Disposed | Disposed of |
| Stolen | Reported stolen |
| Lost | Reported lost |
Creating an asset
- Click Add Asset (top right of the asset list).
- Under Basic Information, set:
- Client (required)
- Asset Type (defaults to Workstation)
- Asset Name (required)
- Make/Manufacturer, Model, and Serial Number
- Under Hardware Specifications, optionally record Operating System, OS Version, CPU, RAM, and Storage.
- Under Network Configuration, optionally add an IP Address and MAC Address.
- In the sidebar, set placement:
- Site Location — choose a location belonging to the selected client (you must pick a client first).
- Physical Location — a free-text note such as "Server Room" or "Desk 5".
- Rack — pick a rack at the chosen location (you must pick a location first). When a rack is selected you can enter Rack Units (U), Start Unit, and End Unit. Exact rack placement can also be set by drag-and-drop on the rack page.
- Optionally record Purchase Date, Purchase Price, and Warranty Expiration.
- Add free-text Notes if needed.
- Click Create Asset.
Asset detail page
The header shows the asset name, its type and status badges, and a Level RMM Connected badge when the asset is synced from Level. From here you can Edit, Back to the list, or Delete the asset (delete requires the delete permission on assets).
A stats row links to the asset's Tickets and shows counts of linked Credentials, Documents, and Software.
Tabs
The detail page is organized into tabs:
| Tab | Contents |
|---|---|
| Overview | Hardware Information (make, model, serial number, OS, CPU, RAM, storage), Purchase & Warranty, and Notes. Warranty dates are highlighted when expired or expiring within 30 days. |
| Network | IP Address, MAC Address, and any configured network interfaces (name, type, IP, MAC, and assigned network) |
| Contacts | People associated with the asset, each with an optional role |
| Credentials | Login credentials linked to the asset; you can add new credentials or unlink existing ones |
| Checklists | Run and track checklists scoped to this asset |
Location sidebar
The sidebar summarizes where the asset lives: its Client, Site, Physical
Location, and Rack (with the rack unit range, e.g. U1-U2).
Level RMM integration
When an asset is linked to a Level RMM device, a Level RMM card appears in the sidebar with an Open in Level link and the following synced fields:
| Field | Description |
|---|---|
| Status | Online / Offline (or Unknown) |
| Security Score | Level's 0–100 security score |
| Last Logged In User | Most recent user reported by Level |
| Last Reboot | Last reboot time from Level |
| OS End of Life | OS end-of-life date; flagged when expired |
| Last Sync | When the asset last synced with Level |
| Device ID | The Level device identifier |
Assets without a Level device ID simply omit this card, and their Level Status
column shows -.
Warranty tracking
Each asset can store a Purchase Date, Purchase Price, and Warranty Expiration. On the detail page, the warranty date is shown in a warning color when it is expiring within 30 days and in red once it has expired.
Managing assets
From the asset detail page you can take two actions:
| Action | What it does |
|---|---|
| Edit | Open the asset edit form to update any asset field, including its client, location, rack placement, and status |
| Delete | Permanently remove the asset. The app archives the asset first (a hard delete is only allowed once an asset is retired/archived) and then removes it. This cannot be undone. Delete is only shown if you have the delete permission on assets. |
To take an asset out of service without deleting it, change its Status (for example to Retired or Inactive) from the edit form.
Tips
- Always capture the Serial Number — it's essential for warranty and vendor support.
- Set the Client and Site Location so assets show up under the right account.
- Use Warranty Expiration dates so the app can flag equipment that needs renewal.
- Link Contacts and Credentials to keep access and ownership information with the asset.
- For rack-mounted gear, record Rack Units so the device renders correctly in the rack view.